Various Orbit Watermaster Sprinkler timers are available in the market, each with varying features and controls.
However, the approaches for handling common problems with these devices are similar and not model-specific.
If you are having trouble with your Orbit Watermaster timer, you can try to resolve it by performing the troubleshooting steps below.
The steps will help you avoid clogging your yard.
Start Witch Checking the Programming
Check the programming settings and adjust them on the control panel if one or more stations are not turning on. There are varying programming settings for different models.
Most models have the option to adjust cycle start times, watering days, watering intervals, and station duration, among other things.
Inspect the Valves
Check the ground sprinkler controls valves if some stations aren’t working.
Ensure the valves are turned on.
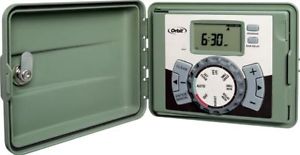
Checking the Timer Dials
Check your timer dial and ensure it is on “Auto” setting. The sprinklers won’t turn on at the programmed times if the timer dial is set to something else other that “Auto”.
Station Delay Settings
Check the Station Delay settings if your sprinklers are not turning on when you program them to.
Adjust the Station Delay settings accordingly by turning the dial to “Station Delay” and then follow these steps:
- Press the plus or minus button to increase or decrease the station delay time.
- So that you have no delay between stations, set the delay to zero.
- Then press “Enter” to save your settings.
Resetting the System
Press the “Reset” button on your timer if the LCD display is blank. If this doesn’t resolve, replace the batteries with fresh ones.
Why Does My Sprinkler Timer Not Work?
Various issues may your Orbit sprinkler timer not work. It could range from a bad connection to a defective timer. Try the following steps to see if the problem resolves:
- Test the outlet you have plugged the Orbit into if it works.
- Check your power cable to ensure it is not frayed or worn through if the outlet is okay.
- Check the docking port’s connection to ensure your timer is plugged in properly.
- If the problem persists, remove the timer and reinsert it into the docking port.
- If you are still not getting power, your timer may be defective.
How Do I Reset My Orbit Timer?
You can reset your Orbit timer by pressing the “PROGRAM RESET” button on the controller. This will clear all your programming but doesn’t remove the factory-installed fail-safe program.
You may need to press it with a small pointed object such as a pen tip as the button is recessed into the panel to prevent an accidental reset.
How to Set an Orbit Water Timer
The Orbit timer has three programs that control a variety of watering plans. Depending on your needs, you can use one or all programs. You can enter your watering schedule in whatever order you like.
Setting start times for programs A or B
To set the cycle start times (time of day that the program begins watering the first station, and all other programmed stations will then follow in sequence) for each program, you will be using, follow these steps:
- Turn the rotary selector to set the CYCLE START TIMES position in the program you want to set up. Depending on the selected program, you will see A or B on the display. The display will show – -:- – and a blinking cursor will appear in the START 1 location.
- Set the time you want to begin watering for cycle start time 1 using the + or – buttons, then press the ENTER button.
- For additional cycle times, press NEXT to advance to the next cycle start time and repeat the process using the + and – buttons to enter the time and press ENTER.
Note that you cannot set a cycle start time for each station. Stations can be assigned to either program A or B or both A and B. Each program can have up to four-cycle start times.
Program A setup
Program A is a two-week daily schedule. Watering may be scheduled for each of the 14 days. After 14 days, the A program continues to repeat itself. To set the watering days:
- Set start times as outlined in the previous steps of setting start times for programs A or B.
- Turn the rotary selector to SET WATERING DAYS. The cursor will blink above the current day in the first week. Any or all days in the two-week schedule can be programmed to water.
- To program a day to water, press ENTER. An arrow will be displayed above the programmed days, and the cursor will move to the next day.
- To advance to a specific day, press NEXT.
- To clear a day, press NEXT until the cursor is above that day, then press CLEAR.
Program B setup
Program B is used to water an interval from 1 to 28 or on odd or even days. To set the watering interval:
- Set start times as outlined in setting start times for program A or B.
- Turn the rotary selector to SET WATERING INTERVAL. The cursor will blink to the right of the word INTERVAL.
- Press the + or – buttons to the desired interval when selecting days. Then press ENTER to program the interval.
- To select either odd or even day watering, press NEXT. The cursor will move to the odd or even setting. Then press ENTER.
- To clear a schedule, press the NEXT button to move the cursor to the schedule and then press CLEAR.
- To enter a new schedule, press the NEXT button to move to the desired schedule and press ENTER.
Setting watering durations and program assignments for A or B
Follow these steps to set the duration for each program you will be using:
- Choose the watering duration for the stations by sliding each switch to its desired time from 2 to 120 minutes.
- To skip a station, move the station’s slide switch to the MANUAL OFF position at the bottom of the slide.
- Set the program slide switch for each station you want to assign to programs A, B, or A and B.
After programming is complete, turn the rotary selector to AUTO. The timer is now fully programmed and ready to use in automatic mode. Each station will operate sequentially in auto mode, starting with program A.
How Do I Set the Time of Day and Date on Orbit Sprinkler Timer?
If it is the first time the timer has been programmed, you should start by pressing the RESET button. Do not press the RESET button again unless you want to remove all your programming completely. Then follow these steps to set the time of day and date:
- Turn the rotary dial to the SET TIME/DATE position.
- 00 AM should appear in the display with three arrows pointing to the year, month, and day.
- Press and hold the + or – button to advance or reverse to the correct time of day.
- Once the correct time of day is reached, press the ENTER button to lock in the time.
Hold down either the + or – buttons to increase or decrease more rapidly until the display goes into rapid advance mode.
- You will see a cursor below the arrow for the year, month, and date when programming.
- Use the + and – buttons to set the correct year, then press ENTER.
- Use the + and – buttons to set the correct month, then press ENTER.
- Use the + and – buttons to set the correct day of the week, then press ENTER.
Why is My Orbit Not Working?
If your Orbit is not working, there could be several possible causes. If one or more stations do not turn on, it could be:
- Faulty solenoid.
- Wire broken or not connected.
- The programming is incorrect.
- Flow control stem screwed down, shutting the valve off.
If stations turn on when they are not supposed to:
- Water pressure is too high.
- More than one start time is programmed.
If all stations do not turn on:
- Programming is incorrect.
- Transformer is defective or not connected.
- Circuit breaker has been tripped.
If one station is stuck on and will not turn off:
- Faulty valve.
- Particles of dirt or debris stuck in valve.
- Valve diaphragm faulty.
If timer will not power up:
- Circuit breaker has tripped.
- Transformer is not plugged into an operational AC outlet.
If stations continue to turn on and off when they are not programmed to:
- More than one start time is programmed with overlapping schedules.
- Excessive pressure.
If circuit breaker trips repeatedly:
- Short in wiring or solenoids.
How Do I Fix My Sprinkler Timer?
You can try to troubleshoot your Orbit sprinkler timer using the following steps:
- Check the programming settings and adjust them on the control panel if one or more stations are not turning on. There are varying programming settings for different models. Most models have the option to adjust cycle start times, watering days, watering interval, and station duration among other things.
- Check the ground sprinkler controls valves if some of the stations aren’t working. Make sure the valves are turned on.
- Check your timer dial and ensure it is on “Auto” setting. The sprinklers won’t turn on at the programmed times if the timer dial is set to something else other that “Auto”.
- Check the Station Delay settings if your sprinklers are not turning on when you program them to. Adjust the Station Delay settings by turning the dial to “Station Delay”.
- Press the “Reset” button on your timer if the LCD display is blank. If this doesn’t resolve, replace the batteries with new ones.
How Do I Manually Run My Orbit Sprinkler Timer?
You can override the automatic program and operate the timer manually using the watering duration slide switches.
The automatic program will be canceled if a manual operation is started during an automatic program cycle. Your timer will revert to the automatic mode after the manual watering duration is set on the slide switch.
Check this too: Best Impact Sprinkler for Low Water Pressure
Manual On- One Station
- Turn the rotary selector to the AUTO position.
- Turn on any individual station by moving that station’s watering duration slide switch to the MANUAL ON position (fully up). The display blinks back and forth between water drop and the time of day.
- Only one station can be active at a time. The last station set to the MANUAL ON position will be watering.
The display will show ON inside a water drop when a station is turned on manually. The display also shows the number of the station that is activated.
Manual timed watering for one station
You can set any single station to go on manually for a specific amount of time from 2 to 120 minutes. To do that:
- First move the watering duration slide switch to the MANUAL ON position, then back to any duration position.
If more than one station is set for manual duration, the timer will activate only the last station you set. Watering can be turned off at any time by pushing the slide switch to MANUAL OFF.
What to Do If the Sprinkler Won’t Shut Off
If a station doesn’t shut off once turned on, It could be because of the following possible causes:
- Faulty valve
- Debris or dirt particles stuck in the valve
- Faulty valve diaphragm
You need to check the valve of the sprinkler and remove any dirt, debris or foreign objects that may be present. If the valve is clear, check the connection to the water line to make sure it is correct. If it still won’t shut off, you may need to replace the diaphragm. Have the person who installed your system do this for you.
How Do I Know If My Sprinkler Solenoid Is Bad and How to Fix It
The controller has a diagnostic fault sensor feature that automatically scans for the presence of a faulty solenoid or wiring short in each station as part of each watering sequence.
If the controller senses a short in a station, it will skip the faulty station and move to the next. The controller displays FAULTY and identifies the faulty station number.
Orbit Sprinkler Timer Display Not Working (Blank Screen, Won’t Turn On)
Press the “Reset” button on your timer if the LCD display is blank. If this doesn’t resolve, replace the batteries with fresh ones. Your Orbit timer most likely requires two AA alkaline batteries. To change the batteries:
- Remove the battery cover by sliding it to the left.
- Insert two AA alkaline batteries into the battery compartment.
- Return the battery cover to its closed position.
How Do I Stop Automatic Watering in My Orbit Timer
To stop automatic watering for 24, 48, or 72 hours, use the RAIN DELAY mode button.
Follow these steps:
- With the rotary dial set to AUTO, press the RAIN DELAY button once.
- The timer will force a 24-hour interruption of all scheduled watering. After 24 hours, the timer will automatically return to its initial watering schedule.
- To increase the rain delay to 48 or 72 hours, press the RAIN DELAY button again until the desired delay time is displayed. Then press ENTER.
- Press CLEAR to cancel the rain delay mode.
How to Shut System Down Completely
To shut system down, turn the rotary dial to the OFF position. The timer will remain programmed but will not water.