Gutters offer the ultimate source of recycled water and preserve the integrity of your roofing. Installing gutters in your shed is a relatively easy process with proper guideline.
Guttering depends on whether your shed has a fascia board or not. Normally the guttering is just below the roofing where it finishes.
Get the shed’s gradient
Use a spirit level to check the slant of the shed This usually informs the angle of guttering of your shed. This will help you identify the exact point on the fascia your guttering will go.
Pay special attention to the downspout. You may have to title your utter at this point to improve the movement of water.
Make appropriate marks as to where you will place your gutter after measurements
Cutting the guttering to size
Cut the gutter material to the required size. Remember that most of the corners, joints, and downpipes will need extra material. To achieve this leave some extra amount of material to facilitate this.
It is easier to make connections on joints and downpipes while the gutter is still on the ground unlike during installation.
It is advisable to commence the joining and attaching the corners, and downpipes joints. Use special adhesives specially made of silicon to ensure that your gutter is firmly bound and doesn’t leak.
You don’t have to attach full lengths after the bends. Just install the bent pieces. You will install the straight connectors once the gutter is on the shed.
Setting up the support braces
Brackets support the gutter on your fascia board. Before installation, you would need to insert brackets well-spaced from each other (Around 3 to 4 feet apart). This maintains necessary support while giving an aesthetic appeal to your shed,
The spacing of the bracket depends on the purpose of your gutter (whether for recycling water or draining it off). Gutters carrying recycling water often needs a steeper slope to keep the water flowing as stagnant rainwater will need more purification before it can be used.
Start by drilling two holes (for 1” screws securing the bracket) for the gutter brackets after making the required marks after measurements. (Generally, a spacing of 20cm is left between tow brackets for a 6 by 4 m these dimensions can be extrapolated to meters using the ratios).
Clipping on the guttering
After installing the brackets, the next step is clipping your guttering. Carefully place the outer lip and slowly let the inner lip fall securely into the bracket. Confirm if the gutter is correctly seated before going to the next bracket.
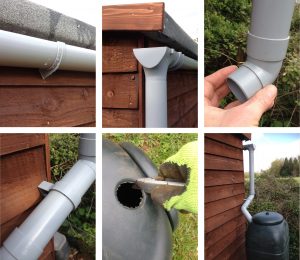
Special attention should be paid to attaching the downpipe to the socket joint. Ensure you connect the shoe that leads to the draining pipe to your tank.
Finishing up the installation
Mount your water butt under the end of the downpipe. Cut a 6ft pipe insert one-half into the downpipe, making the water butt flush against the shed.
Measures then attach the necessary pipe length. Secure the end using an offset bend joint.
Connect the joint, and then move the pipe into a hole in the water storage tank.
Fixing your gutter depends on a variety of factors. Depending on your shed dimensions, and whether you have a tank to recycle the water. The process is meticulous and needs proper attention and care.